The Bluffer’s Guide to Astronomy Photography wth Mark Gee
The Astronomy Photographer of the Year lends some trade secrets.
Stars are fascinating. They've been pretty practically useful - as a tool for navigation for seafarers, markers of time and seasons; but they've also captivated our souls, commonly mistaken for gods in most early cultures, and the go-to romantic setting for any date or film script. No wonder we try to capture them.
The first camera was invented back in 1826, and not too soon after did we start instinctually pointing those gadgets at the sky - the first astrophotograph taken of the moon in 1840, and even before the turn of the century - around 1880s - were astrophotographers like Henry Draper and Andrew Ainslie Common taking long-exposure shots of the stars and nebula.
So for those who'd like to learn how to capture the stars on film (or pixel, these days), we've enlisted the help of Astronomy Photographer of the Year for 2013, Mark Gee, who'll take us through some of the insider trading secrets to getting that photo. It's not as easy or cheap as you'd think, but it's worth it.

THINGS THAT CAN GO WRONG
"Everything." (laughs)
Given that it is the sky you'll be photographing, the weather is the biggest factor that can make or break your shot. Mark's had countless experiences of spending half an hour setting up a shot and just before pressing the shutter button clouds start rolling in. Or he'd set up and everything would be perfect until a big gust of wind would come through and the camera would start jumping up and down, ruining the shot. Weather malfunctions are just part of the job of photographing the sky.
Other things that can go wrong range from equipment failure to unexpected landscape problems like landslides - once Mark went to shoot photos at Cape Palliser and there was a landslide on the road so he couldn't get past in a car, and ended up having to hike with all his gear.
Another time, he left his gear for a timelapse at Red Rocks, and when he got back a seal had cosied up around the tripod (probably for some heat from the battery grip), ruining the footage in the process.
But although it's an uphill struggle, and getting the perfect picture isn't immediate "to finally nail a shot, is amazing".
WHAT TO USE
Mark uses a DSLR Canon 5D Mark III, with a variety of lenses, his main lens being the Canon 14mm F2.8. The key points for landscape astrophotography is to get one of the smaller F-stop lenses for maximum light, as well as a good wide angle lens - meaning anything below 35mm. Camera body-wise you're ideally looking for a full frame censor camera, to be able to capture as much light and information, but if money's a constraint you can still get pretty good shots out of a crop censor like the Canon 7D.
EXPOSURES 101
How do you work out what exposures to use? Exposure settings greatly depend on the ambient light around - whether there's light pollution (meaning light emitted from households, street lamps and the like) or not. Around dark sky areas like the Wairarapa and Cape Palliser, Mark uses between 25/30 seconds exposure times with his lens wide open at F2.8 and ISO3200, as his standard go-to settings.
Dark sky without variables is easier to work out apertures for, where with photography closer to the city it's a balance of getting enough information, without blowing out the lights in the city.
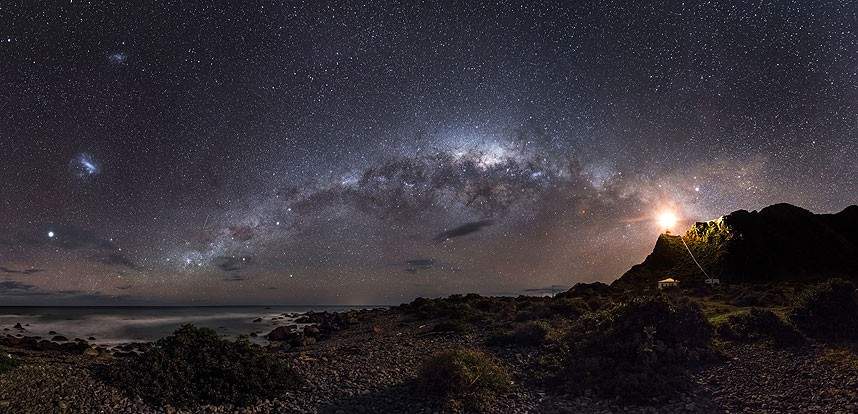
Interestingly, Mark's photography doesn't use any added 'artificial' light, relying wholly on the light already available - his lighthouse images are all lit only by the stars and the lighthouses themselves.

WHERE TO GO
Mark's based in Wellington, which is unusually blessed with dark night sky starting around 15 min outside of the town centre, his go-to star photography areas including the Wairarapa, the Castle Point area, and his favourite, Cape Palliser.
For those not in the Wellington area, any countryside with as little light pollution (meaning light being emitted from households) as possible is good. The creme de la creme spot for star photography in New Zealand's the Aoraki Mackenzie Dark Sky Reserve in the South Island, which has a gold rating in terms of being light pollution-free.
WHAT TO PACK
Since any star photography expedition usually lasts all night, Mark usually overpacks, taking his lenses and camera; a backup camera (you never know); a video tripod - because they're a lot sturdier than normal photography tripods; and Gigapan Epic Pro, which is the robotic camera head used to create panographs, like his winning photograph. For any timelapses, he packs a Christchurch-based company's electronic motor called the Genie, and a slider as well. To avoid his camera batteries dying, Mark uses a battery grip with two camera batteries, which gives around 10 hours of battery life, enough for one night. He also uses a lens heater, which is a simple little velcro strap with heater attached, to combat any condensation.
Oh, and he packs thermals too, as it can get pretty cold staying out there all night.
WHAT TO DO
Once you've got your settings, think about your composition, using photography rules like the rule of thirds. It takes about 20 minutes for your eyes to adjust to the dark, after which you'll be able to use the viewfinder to set up the shot if you're in dark country like the Wairarapa. Other than that it's just taking different exposures to get it right. It takes Mark about 30 minutes to set up a shot's composition.
But besides the obvious, there isn't much else to do while waiting for a shot or timelapse. While waiting for the shot, Mark just hangs outside for a while, looking at the sky, or for timelapses (which generally take a few hours) he'll leave after making sure everything's working and go sleep in the car.

PATIENCE, PERSISTANCE AND PLANNING
It's not going to happen overnight. You have to put in the time to get the shot.
The 'Full Moon Silhouettes' video took a year to get right. There were many times when everything - the weather, the settings, the moon, was perfect, but Mark's position was out by just 5 metres, and so the moon would rise off-camera. So a lot of patience and persistence was involved.
Planning-wise, there were quite a few logistics that went into getting the shot. Wanting to photograph the optical illusion of having tiny people and a giant moon, Mark knew he'd have to stand pretty far back, 2.1 km in fact. Standing so far back he then had to use the longest lens he had which at the time was a 500mm, but a 2x converter on it to make it 1000mm, and because he was using a crop censor camera it took the range up to around 1200mm.
The trickier part was finding the position where to stand. For that he used android/iPhone apps like TPE and Photo Pills, which give you the moon phrases, and if you pinpoint the position where you're shooting from it'll tell you what time the moon'll rise and from what angle. Although that may sound easy, a lot of the time you'd reach the position and realise that although it's perfect, a tree or something like that might be blocking the way, so you have to move. And by that time it's already too late.
So it just happened that after a year of trying and planning and adjusting, everything finally went perfectly and he got the shot.
INSPIRATION
The video which set Mark in the right track with landscape astrophotography was a video made by video Ben Canales, which gave him the basis of what he really needed to know. His biggest advice he kept repeating was just to have "patience, planning, and persistence" - without them you're just not going to get really good shots, unless you get lucky.


- The Ten Best Hotels in Brisbane
- The Best Glamping Sites Around Australia
- Predicting the Oscars: Who Should, Could and Will Win at the 2025 Academy Awards
- Ten of the Most-Unique and Relaxing Stays You Can Book Around Auckland
- Unique Stays with Breathtaking Views of New Zealand's South Island
- The Most-Impressive Group Stays You Can Book in Byron Bay